View Payment Form Responses and More
Payment forms are trackable, and responses are automatically sorted into reports for viewing in platform or exporting to Excel. View the information users submitted in a form as well as amount paid.
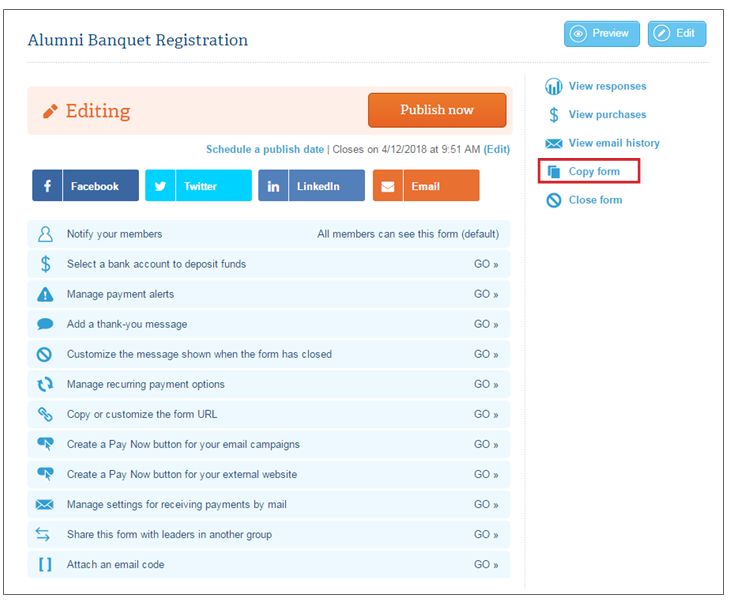
In addition to a payment form report, each payment form you create will have a unique admin page with individual data. Admins have access to these features:
Copy form
Close an open form or set close date
Notify your members
Manage alerts
Add a thank-you message
Customize the message shown when the form has closed
Copy, customize, or shorten the form URL
Create a button for your email campaigns
Create a button for your external website
Share this form with leaders in another group
Social media sharing
How do I view payment form responses?
1. On the left navigation sidebar, click on Payment Forms
2. In the submenu, select Payment Forms Report
3. In the dropdown menu, select the form for which you want to see responses. All responses willappear in the table below
1. On the left navigation sidebar, click on Payment Forms
2. In the submenu, select Payment Forms Report
3. In the dropdown menu, select the form for which you want to see responses. All responses willappear in the table below

Viewing options: You can sort columns by clicking on headers at the top of table. You also can filter by dates. The Export Table button allows you to export your form responses to an Excel spreadsheet. (For more advanced sorting and filtering options, including pivot tables as well as a more expanded view, we recommend you export your database to Excel.)
Copy form
This feature allows admins to make a copy of an existing payment form, ideal for creating a variation of a payment form without altering the original.
1. On the left navigation sidebar, click on Payment Forms
2. Select the title of the form you want to copy
3. Near the top right of the admin page, click Copy Form
4. A copy of the new form will appear in edit mode. Customize your form or Save
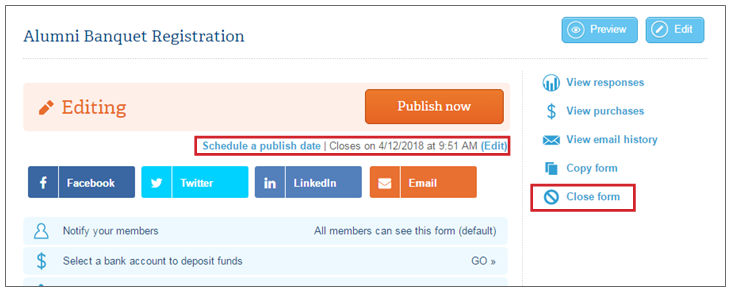
Close an open form or set close date
Admins have the option to set a close date for a payment form so members will no longer be able to submit responses.
1. On the left navigation sidebar, click on Payment Forms
2. Select the title of the form you want to close or set a close date for
3. Click Close Form near the top right of the admin page The payment form will be closed immediately.
To set a close date, click Edit next to the date of close (below the Publish Now button). An overlay will appear. You have the option to set a close date and time, or to close the form after a set number of responses.
Notify your members
If you created a payment form, the next step is to make it accessible to your members. By default, published payment forms are accessible to all your members using the platform. This feature allows admins to select specific members or a list of members who can view the payment form from their memberplanet account. When members log on from the mobile app, the form will appear in their activity feed.
1. On the left navigation sidebar, click on Payment Form
2. Select the title of the payment form you want to notify your members for
3. Admins have two options:
4. Click the Save & Close button
If you created a payment form, the next step is to make it accessible to your members. By default, published payment forms are accessible to all your members using the platform. This feature allows admins to select specific members or a list of members who can view the payment form from their memberplanet account. When members log on from the mobile app, the form will appear in their activity feed.
1. On the left navigation sidebar, click on Payment Form
2. Select the title of the payment form you want to notify your members for
3. Admins have two options:
- Choose Members: Use the search bar to search members by first and last name or email, then select members using their respective check boxes
- Choose a List: Select the desired list(s) of recipients
4. Click the Save & Close button
Manage alerts
This feature allows admins to receive an email alert once someone submits a payment form response.
1. On the left navigation sidebar, click on Payment Forms
2. Select the title of the form you want to receive a notification for
3. Click Manage Alerts in the feature list
4. On the overlay that appears, select the check box to activate this feature
5. Enter email addresses that will receive the notification
6. Click Save
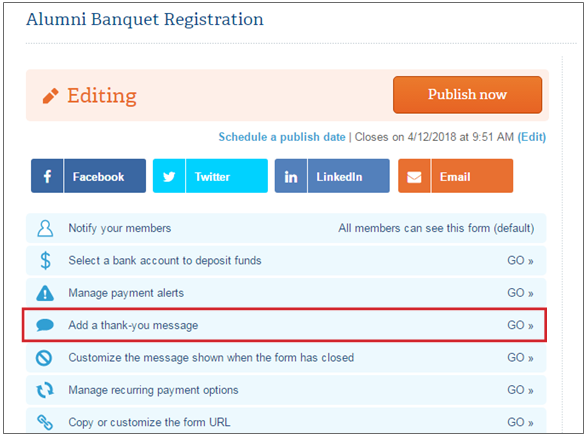
Add a thank-you message
Once a member submits a payment form response, a confirmation email automatically goes out to the member. Admins have the option to include a thank-you message in the confirmation email.
1. On the left navigation sidebar, click on Payment Forms
2. Select the title of the payment form you want add a thank-you message for
3. Click Add Thank-you Message in the feature list
4. You have two checkbox options:
Add a thank-you message to the confirmation email
Add a thank-you message to the confirmation email
- Upon selecting this feature, a text box will appear wherein you can write a custom message.
- You can select an existing email campaign to be sent.
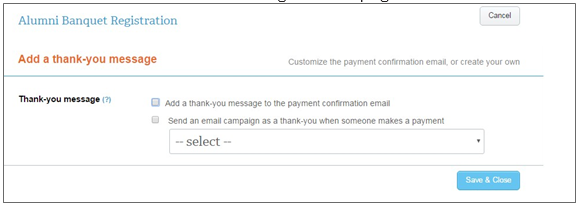
5. Click Save
Customize the message shown when the form has closed
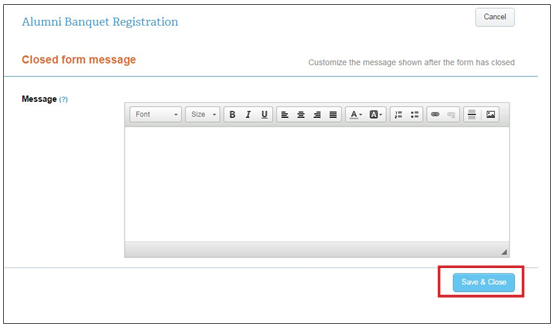
When a member attempts to view a form after it has closed, the form fields will no longer be visible. Instead, a message will be shown to the user notifying them that the form is closed. Admins can customize this message.
1. On the left navigation sidebar, click on Payment Forms
2. Select the title of the payment form you want to customize the message for
3. In the features list, click Customize the Message Shown When the Form Has Closed
4. Type your customized message in the text box
5. Click Save & Close
Copy, customize, or shorten the form URL
Admins have the option to modify part of the payment form URL as well as use a built-in URL shortener when the number of characters in the URL is an issue. Modifying the URL works best when you want to create a more memorable URL, use keywords, or use a naming convention. Shortening the URL is convenient when there’s a need to limit the number of characters, such as in a 140-character tweet.
1. On the left navigation sidebar, click on Payment Forms
2. Select the title of the payment form you want to copy or customize the form URL for
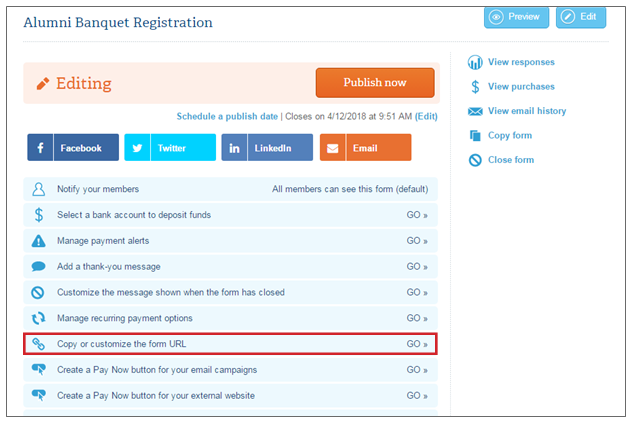
3. In the features list, click on Copy or Customize the form URL
4. An overlay will appear with the following options:
Admins have the option to modify part of the payment form URL as well as use a built-in URL shortener when the number of characters in the URL is an issue. Modifying the URL works best when you want to create a more memorable URL, use keywords, or use a naming convention. Shortening the URL is convenient when there’s a need to limit the number of characters, such as in a 140-character tweet.
1. On the left navigation sidebar, click on Payment Forms
2. Select the title of the payment form you want to copy or customize the form URL for
3. In the features list, click on Copy or Customize the form URL
4. An overlay will appear with the following options:
- To copy either the full URL or shortened URL, click on the respective Copy to Clipboard
- Click the Customize button to modify part of the form URL. The text box that appears will allow you to edit the portion of the URL that is customizable. Click Save.
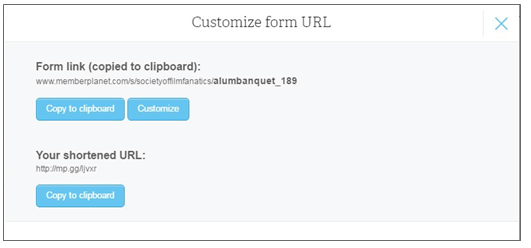
Note: After you customize your URL, your previous URL will no longer work. If you have given out your old URL to anyone, they will no longer be able to use it. Shortened URLs do not change, so users can continue to use the same shortened URL whether or not you edit the full URL.
Create a button for your email campaigns
When creating email campaigns, you have the option to include buttons – not just links – for any form
created on the platform.
1. On the left navigation sidebar, click on Payment Forms
2. Select the title of the payment form you want to create a button for your email campaigns
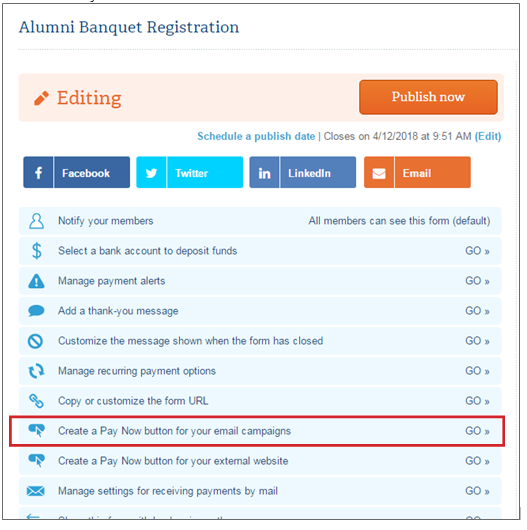
3. In the features list, click Create a Pay Now Button for Your Email Campaigns
4. Admins have one of two options to select:
When creating email campaigns, you have the option to include buttons – not just links – for any form
created on the platform.
1. On the left navigation sidebar, click on Payment Forms
2. Select the title of the payment form you want to create a button for your email campaigns
3. In the features list, click Create a Pay Now Button for Your Email Campaigns
4. Admins have one of two options to select:
- Choose a Button: Use the dropdown menu to select the desired button text, then click on the color of your choice.
- Upload Your Own Image: Click the Choose Image button, and drag and drop your desired image into the allotted area, or click to browse and upload. Complete the prompts to upload and crop your image if needed, then click Save.
Note: Recommended image size is 580 px or smaller.
5. To use your button in an email, navigate to the email you want to use and go to Step 4: Content
6. In the body of your email, select the area you wish to insert the button, then click Buttons in the toolset that appears
7. In the pop-up window that appears, click on the Type dropdown menu and select Form Button
8. Click the Go button for corresponding form you want to use. Your button will appear in the areaselected
To learn how to create an email, see page 48.
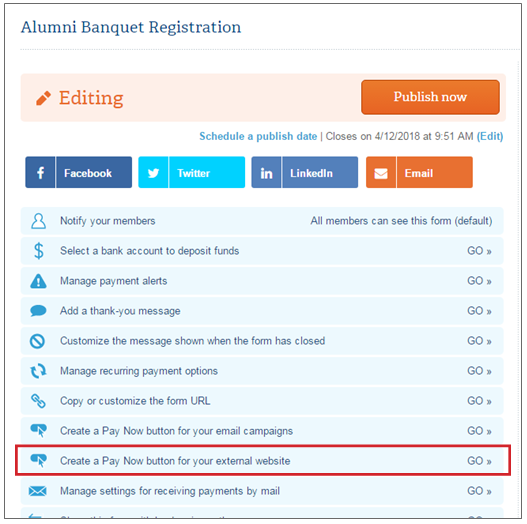
Create a Pay Now button for your external website
Admins can let anyone fill out payment forms, whether or not he or she is a member of the group. This feature can be used for times when you want to use a button on an external website to drive users to fill out a payment form.
1. On the left navigation sidebar, click on Payment Forms
2. Select the title of the payment form you want to create a button for your external website
3. In the features list, click Create a Pay Now Button for Your External Website
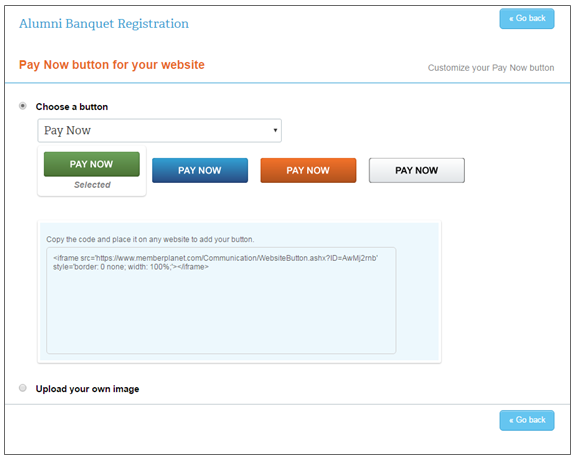
4. Admins have one of two options to select:
•Choose a Button: Use the dropdown menu to select the desired button text, then click on the color of your choice
•Upload Your Own Image: Click the Choose Image button, and drag and drop your desired imageintotheallottedarea,orclicktobrowseandupload. Complete the prompts to upload and crop your image if needed, then click Get Code Snippet
Note: Recommended image size is 580 px wide or smaller.
5. A shaded box will contain the HTML code for your button. Copy the entire segment, and paste it into your website.
Each external website builder is different. Check out the customer support for your website hosting company for instructions on embedding the code.
Share this form with leaders in another group
Many organizations have sister groups, local chapters or clubs, or other groups they collaborate with. If the group you work with also uses memberplanet, you can share a payment form or any other form with admins or leaders from that group. This feature helps save time for other admins who will utilize the form on the platform for their own member engagement efforts.
1. On the left navigation sidebar, click on Payment Forms
2. Select the title of the payment form you want to share with leaders in another group
3. In the features list, click Share this Form with Leaders in Another Group
4. Use the search box to search for the group name
5. Select Add for the desired group
6. Click Save

Social media sharing
Admins have the option to share payment forms and other forms straight from the platform. You can do this immediately after publishing a form from the published confirmation message, or navigate to an existing payment form’s admin page.
1. On the left navigation sidebar, click on Payment Forms
2. Select the title of the payment form you want to share on social media
3. Above the features list, click on the desired social media platform button to share
4. A pop-up window will appear to allow you to type in a custom message when you post to social media. After typing in your message, select your desired share settings, and publish to social media