How Do I Generate a Report?
This function allows admins to view, edit, and export all money related group transactions. Tables can be viewed as a whole, or filtered into smaller groups based on the desired information.
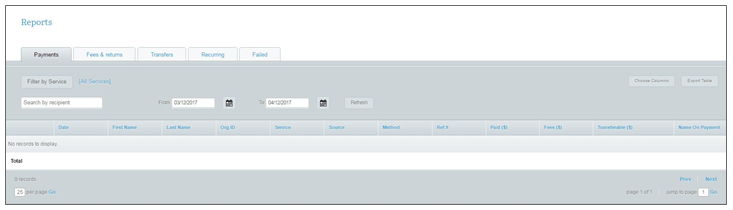
1. On the left navigation sidebar, click on Reports, then select the tab for the report you want to view from the five options:
Payments: This gives administrators the ability to view all payments made to the group. Admins can filter the table results in several different ways.
Recipient: Locate the payments of an individual group member.
Payments: This gives administrators the ability to view all payments made to the group. Admins can filter the table results in several different ways.
Recipient: Locate the payments of an individual group member.
- Enter a member’s last name, click Refresh
- Click on the calendar icon
- Select your date range, click Refresh
- Click on Filter by Service
- Uncheck the pay information you don't want to include
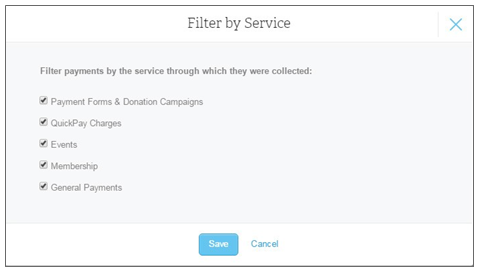
3. Click Save
Refunds: Admins can approve refunds to members at their own discretion.
Fees & Returns: This provides club admins with a report on fees collected and from which members, as
well as, on which transaction. There are four types of fees:
Subscription Fee (optional): Basic accounts on memberplanet are free, but many groups choose to upgrade their account to increase their communication volume, save on payment processing rates, and receive additional customer service options.
Site Fee: a small surcharge deducted from all payments collected. Purchasing a subscription can significantly reduce the site fee and is a great way to save on high-volume processing.
Processing Fee: minimal fee deducted from payments collected on the system that covers the cost of processing
Note: The site fee plus the processing fee make up the total fee charged per transaction.
Returned Payment Fee: a returned payment fee incurred when a payment is returned.
Generally, these are credit or check payments where there were not enough funds in the account, the check information was entered incorrectly, or a member disputed the payment.
Transfers: When your members make payments like donations, dues, or purchases, memberplanet collects and holds the funds until the transfer period ends. Depending on the previously-chosen transfer option, fund balances are dispersed into the group bank account each week, month, quarter, or year. To view the details of a particular transaction:
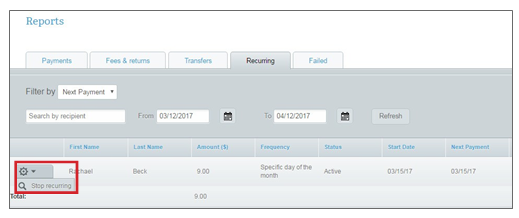
Recurring: View the details of all recurring payments. They can be filtered by the start date or by next payment. To view recurring payment schedules that are complete, click the Show Completed Schedules box.
Members can view and stop their own recurring payments, but admins can also view and disable a
recurring payment from this tab. To disable a member’s recurring payment:
Refunds: Admins can approve refunds to members at their own discretion.
- Click on the gear icon beside the member
- Select Refund
- Choose the amount to be refunded
Fees & Returns: This provides club admins with a report on fees collected and from which members, as
well as, on which transaction. There are four types of fees:
Subscription Fee (optional): Basic accounts on memberplanet are free, but many groups choose to upgrade their account to increase their communication volume, save on payment processing rates, and receive additional customer service options.
Site Fee: a small surcharge deducted from all payments collected. Purchasing a subscription can significantly reduce the site fee and is a great way to save on high-volume processing.
Processing Fee: minimal fee deducted from payments collected on the system that covers the cost of processing
Note: The site fee plus the processing fee make up the total fee charged per transaction.
Returned Payment Fee: a returned payment fee incurred when a payment is returned.
Generally, these are credit or check payments where there were not enough funds in the account, the check information was entered incorrectly, or a member disputed the payment.
Transfers: When your members make payments like donations, dues, or purchases, memberplanet collects and holds the funds until the transfer period ends. Depending on the previously-chosen transfer option, fund balances are dispersed into the group bank account each week, month, quarter, or year. To view the details of a particular transaction:
- Click on Transfers
- Locate the transaction you’d like details on
- Select the gear icon, click on View/Edit
Recurring: View the details of all recurring payments. They can be filtered by the start date or by next payment. To view recurring payment schedules that are complete, click the Show Completed Schedules box.
Members can view and stop their own recurring payments, but admins can also view and disable a
recurring payment from this tab. To disable a member’s recurring payment:
- Select filter by Start Date from the dropdown menu
- Enter the recipient’s last name into the Search by Recipients field
- Use the date field to select your date range
- Click Refresh
- Click the gear icon next to the person’s name to view
- Choose Stop Recurring and verify that you want to end the recurring payment
Failed: This allows admins to view payments that failed to process. There are four general reasons payments fail.
- The card used has expired
- The card used has been terminated
- Insufficient funds
- Bank account has been closed
How do I export a table?
All tables can be exported either as is shown with all column details, or filtered to export only the information columns you need. To filter a table:
All tables can be exported either as is shown with all column details, or filtered to export only the information columns you need. To filter a table:
- Click on Choose Columns
- Select which columns you’d like to include on your export
- Click Export