How Do I Create a Payment Form?
Online payment forms allow admins to collect payments and information at the same time. Payment forms are secure and convenient for both club administrators and members. In addition to being easily accessible and trackable, offering electronic payment methods also gives members the option of setting up recurring payments. The platform offers a wide array of payment styles to meet every club’s needs.
If you are looking to collect member dues, the best way to do that is through the membership module. This will ensure that member dues are automatically accounted for in membership reports, and the data is fed back to the database for you to take advantage of the platform’s comprehensive membership features.
Note: Security is enforced on multiple levels. Only group admins with specific permissions have access to the Collect Payment function, and the payment information is transmitted securely via SSL, encrypted and tokenized on the memberplanet servers.
This support document reviews the following features:
How do I create a payment form using a template?
How do I create a payment form from scratch?
Add and edit payment items
How do I assign the convenience fee to the payer?
Enable pay-by-mail
Collect payments with the mobile app
How do I create a payment form using a template?
3. Once you have found the template you want to use, click the Use This Template button
- On the left navigation sidebar, hover over Payment Forms, then select Create a Payment Form on the submenu
- Select a template from the available options.
3. Once you have found the template you want to use, click the Use This Template button
How do I create a payment form starting from scratch?
If you want to completely customize your payment form instead of starting from a template, start from a blank payment form.
If you want to completely customize your payment form instead of starting from a template, start from a blank payment form.
- On the left navigation sidebar, hover over Payment Forms, then select Create a Payment Form on the submenu
- Select Blank Payment Form

Customize the look of a payment form
These next steps allow admins to choose a specific color palette and upload a banner -- ideal identifiers for brand recognition and consistency.
These next steps allow admins to choose a specific color palette and upload a banner -- ideal identifiers for brand recognition and consistency.
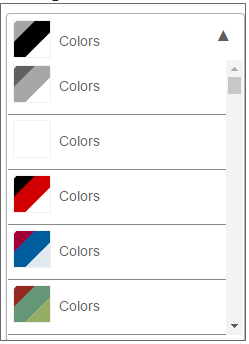
- Click the Colors dropdown menu
- Select a color palette from the available options. A preview of the colors selected will appear to the right
3. Hover over the banner image section. Click on the edit icon that appears
4. An overlay will appear. Drag and drop your desired photo into the allotted area, or click to browse and upload
Note: The recommended image size is 900 px wide.
5. Click the Upload button
4. An overlay will appear. Drag and drop your desired photo into the allotted area, or click to browse and upload
Note: The recommended image size is 900 px wide.
5. Click the Upload button
Structure your payment form and determine what info to collect
Admins have a variety options available to customize the structure of their payment form, use different input field types, and further define field options.
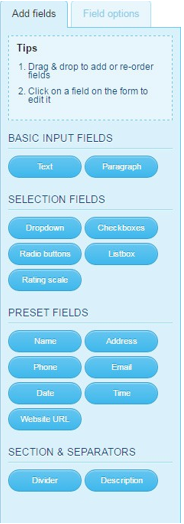
On the Add Fields tab, you have the option to drag and drop four different types of fields into the payment form:
Basic: text or paragraph
Selection: dropdown, radio buttons, etc.
Preset: name, address, etc.
Section & Separators: divider or description
3. Use the Field Options tab to label, assign default values, and add notes to each field. Click on the field you want to edit and fill in the corresponding text boxes appearing on the left
Admins have a variety options available to customize the structure of their payment form, use different input field types, and further define field options.
On the Add Fields tab, you have the option to drag and drop four different types of fields into the payment form:
Basic: text or paragraph
Selection: dropdown, radio buttons, etc.
Preset: name, address, etc.
Section & Separators: divider or description
- Name your form
- Add a new field by dragging it from the Add Field tab and dropping it onto your payment form. It will embed where you drop it
3. Use the Field Options tab to label, assign default values, and add notes to each field. Click on the field you want to edit and fill in the corresponding text boxes appearing on the left

|
Pro Tip: One of the field options is to pre-fill fields with member information, which can save time for users. As long as they’re logged in, or coming to the form from a personalized link in an email campaign, their information will already be filled out for them and they can skip the field. Basic member data like name, email, contact info, address, and any custom membership questions your club has are available for pre- filling. Please note that certain types of fields can only be pre-filled with certain types of member info. For example, you must add a Name field to your form; you cannot pre-fill the member’s name into a Basic Text field.
|
4. Remove a field by selecting it on your form and clicking the trash icon located on the Field Options tab
5. When you are ready to add payment items, click Next
5. When you are ready to add payment items, click Next
Add and edit payment items
Admins have the option to set the following attributes for payment items: Type, Label, and Item Group Label. You can also set any item as required.
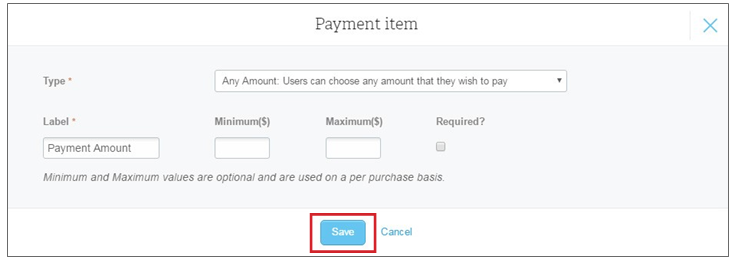
Payment Type defines how a user interacts with a payment item. Admins can set the type to:
Payment Label: the name an admin gives to a payment item, which is visible to a user
Item Group Label: the name an admin gives to a group of payment items, which is visible to a user. For example, if your payment form has a group of different sized blue T-shirt items, they may all be labeled under “Blue T-shirts”
Admins have the option to set the following attributes for payment items: Type, Label, and Item Group Label. You can also set any item as required.
Payment Type defines how a user interacts with a payment item. Admins can set the type to:
- Any amount: Users can choose any amount they wish to pay. (This is usually done for donations.)
- Any amount (multi-item): Users can choose a few different amounts that add up to their total payment.
- Fixed amount: All users will pay the same fixed amount. This displays as a required payment item to a user.
- Fixed amount (multi-item): Users can pick one fixed amount from a few different choices.
- Item quantity: Users will choose a quantity of an item. For example, they can choose the quantity of T-shirts (fixed price) to purchase.
- Item quantity (multi-item): Users can choose quantities of different items.
Payment Label: the name an admin gives to a payment item, which is visible to a user
Item Group Label: the name an admin gives to a group of payment items, which is visible to a user. For example, if your payment form has a group of different sized blue T-shirt items, they may all be labeled under “Blue T-shirts”
- To add a payment item, click the Add Payment Item button
- Select Payment Type from the dropdown menu
- In the overlay that appears, enter the Payment Label and other information for the item for which you are receiving payment
- Click Save
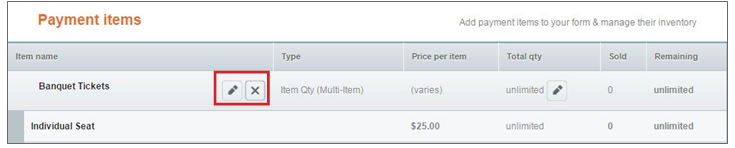
To edit or delete an existing payment item, click the pencil icon or X icon next to the item name.
5. When you have completed adding and editing payment items, click Save & Close
How do I assign the convenience fee to the payer?
By default, the Convenience Fee, which is the processing fee deducted from payments collected on the
system, is charged to the organization.
By default, the Convenience Fee, which is the processing fee deducted from payments collected on the
system, is charged to the organization.
- To assign the convenience fee to the payer, click More Options on the Payment Items page
- Next to Convenience Fee, select the radio button Users Filling Out the Form Will Pay the Fee
- Click Save & Close
Enable pay-by-mail
By default, pay-by-mail is disabled because it only applies to packets. Packets are multiple online forms bundled together because the information needs to be submitted together. For example, registration usually consists of multiple forms that all need to be filled out and submitted at once.
By default, pay-by-mail is disabled because it only applies to packets. Packets are multiple online forms bundled together because the information needs to be submitted together. For example, registration usually consists of multiple forms that all need to be filled out and submitted at once.
- To enable pay-by-mail, click More Options on the Payment Items page
- Next to Pay-by-mail, select the radio button Allow people to pay by mail (only applies to packets)
- Click Save & Close
Collect payments with the mobile app
Through memberplanet’s mobile app, admins can collect payments for their group on the go. You can use your smartphone to scan credit cards to accept payments without any additional hardware. This tool can be used for payments on site, such as at an event, Donation Sites, and other payment forms. It can help your group raise money for a cause or collect funds in an easy and efficient way.
b. To accept the payment on the spot, make sure Pay Now is selected
c. Enter the amount
Note: The mobile app allows admins to collect credit card payments without any extra hardware. Use the camera of any iPhone or Android smartphone to read the information directly from a credit card. Scanning the credit card does not save the photo to your device.
Security
Security is enforced on multiple levels. Only group admins with specific permissions have access to the Collect Payment function, and the payment information is transmitted securely via SSL, encrypted and tokenized on the memberplanet servers.
Through memberplanet’s mobile app, admins can collect payments for their group on the go. You can use your smartphone to scan credit cards to accept payments without any additional hardware. This tool can be used for payments on site, such as at an event, Donation Sites, and other payment forms. It can help your group raise money for a cause or collect funds in an easy and efficient way.
- Log on to the memberplanet app
- Tap the list icon in the upper left side of the screen
- Tap Collect Payment
- Tap the group for which you are raising funds
- Tap the payment item you would like to collect for, such as a form, Donation Site, or general payment
- If you are collecting a payment from an existing member: Tap the member you would like to collect from
- If you are collecting a payment from someone who has yet to be added to the group: Tap Not a member
b. To accept the payment on the spot, make sure Pay Now is selected
c. Enter the amount
Note: The mobile app allows admins to collect credit card payments without any extra hardware. Use the camera of any iPhone or Android smartphone to read the information directly from a credit card. Scanning the credit card does not save the photo to your device.
Security
Security is enforced on multiple levels. Only group admins with specific permissions have access to the Collect Payment function, and the payment information is transmitted securely via SSL, encrypted and tokenized on the memberplanet servers.
Glossary
Payment Type defines how a user interacts with a payment item. Admins can set the type to:
Payment Label: the name an admin gives to a payment item, which is visible to a user.
Item Group Label: the name an admin gives to a group of payment items, which is visible to a user.
Convenience Fee: the processing fee deducted from payments collected on the system. By default, this fee is charged to the organization.
Packets: multiple online forms bundled together because the information needs to be submitted together. Packets are the only forms for which admins have the option of enabling pay-by-mail.
Payment Type defines how a user interacts with a payment item. Admins can set the type to:
- Any amount: Users can choose any amount they wish to pay
- Any amount (multi-item): Users can choose a few different amounts that add up to their total payment
- Fixed amount: All users will pay the same fixed amount
- Fixed amount (multi-item): Users can pick one fixed amount from a few different choices
- Item quantity: Users will choose a quantity of an item
- Item quantity (multi-item): Users can choose quantities of different items
Payment Label: the name an admin gives to a payment item, which is visible to a user.
Item Group Label: the name an admin gives to a group of payment items, which is visible to a user.
Convenience Fee: the processing fee deducted from payments collected on the system. By default, this fee is charged to the organization.
Packets: multiple online forms bundled together because the information needs to be submitted together. Packets are the only forms for which admins have the option of enabling pay-by-mail.