Advanced Email Techniques
These more advanced functions allow for enhanced customization, coding, and advanced testing techniques using HTML, to make the most of the platform’s email functionality for your group.
Tables
If working within a template doesn’t suit your needs, an email can be built completely from scratch. Tables allow admins to create an email purely from their own vision. Building through tables is a highly specific task, therefore these instructions will take you through some vital elements in each step of the process in general. This is not intended to encompass all options available.
If working within a template doesn’t suit your needs, an email can be built completely from scratch. Tables allow admins to create an email purely from their own vision. Building through tables is a highly specific task, therefore these instructions will take you through some vital elements in each step of the process in general. This is not intended to encompass all options available.
- Select a basic template
- Delete the basic information from the template
- Click inside the email window to bring up the editor toolset
- Click on the table icon in the editor toolset
- Decide how many rows and columns you want in your email
Best practices:
•Set your table width to 580 pixels regardless of the content you’ll be adding. This will prevent any of your text from bumping against the outermost edge of the email.
•Enter the width of your center column to ensure your other columns' content doesn’t run into each other.
•Set your table width to 580 pixels regardless of the content you’ll be adding. This will prevent any of your text from bumping against the outermost edge of the email.
•Enter the width of your center column to ensure your other columns' content doesn’t run into each other.
Borders
Creating a border around your email isn’t required, however it does give your email a frame that increases its professional appearance.
To create a border, simply add another column and row to your table. For example, a 3x3 table will become a 4x4 table to incorporate a border.
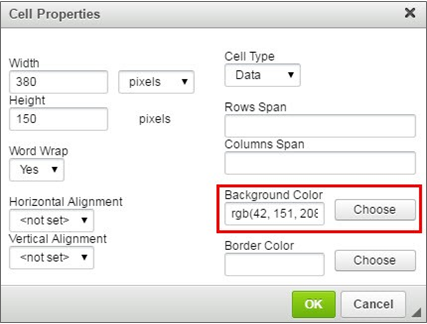
To add color to your border, right click on each cell, select Cell Properties and change color.
Note: Colors can be set using RGB or the hex code.
Best practice: If using a border, it’s a good idea to also add a padding column and row to your table. This should be set at 10 pixels. This padding will ensure your images and text don’t run into the border edges to create a visual mess.
Columns/additional tables
You can continue to modify the design of your email by adding more tables within your central table. Repeat the table creation process for each element you wish to add. For example, if you want to add a picture to one of your columns, creating a sub-table will allow you to place that image exactly where you want it without ruining the other table design elements.
When adding additional tables, it is important to also add an additional column for padding. Similar to the border padding, table padding allows your inserted element to have a defined space within the email. Think of a photo in the middle of a newspaper column, and how the words flow around it without the column turning into a zig-zag.
Best practices:
•Before adding images, resize them to 150 pixels. If you don’t have edit image software: Perform a browser search for “Image editor.” Any of the numerous, free results will guide you through editing your image to the correct pixel size.
•Be sure to select a font and to set a font size for the text of your content.
HTML
If you prefer to build your email using HTML code, or to make edits directly to the source code, simply click on the HTML tab on the editor tool. This will bring up the HTML code for you to work in.
Note: You can tag your HTML edits to easily locate code changes you make.
If you prefer to build your email using HTML code, or to make edits directly to the source code, simply click on the HTML tab on the editor tool. This will bring up the HTML code for you to work in.
Note: You can tag your HTML edits to easily locate code changes you make.
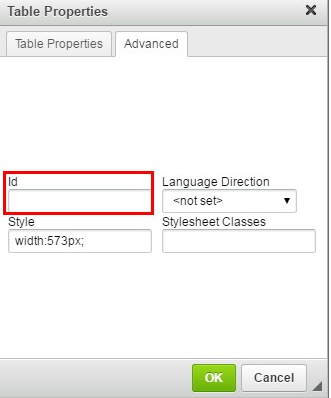
- Once you've added your table, right click on it and select Table Properties
- Within the Table Properties window, select Advanced
- In the ID window, enter your tags
- Search for them from within the HTML editor window
Test copies: Sending test copies to multiple email client servers is the best way to ensure that your email looks correct regardless of the recipient’s email client.
Best practice: At least check recipients with a @gmail, @yahoo, and an @outlook email server to be sure
you’ve hit the majority of recipients’ email clients.
Best practice: At least check recipients with a @gmail, @yahoo, and an @outlook email server to be sure
you’ve hit the majority of recipients’ email clients.


